Buy PodPillows!


Categories
Archives
Tiny Protoquilt
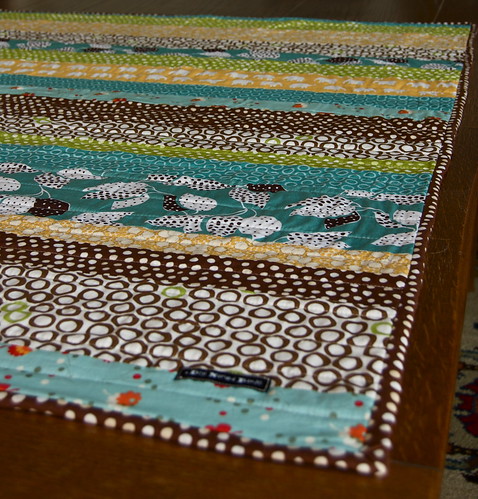
Here’s a small project that uses the amazing Bernina Stitch Regulator (BSR). It’s a tiny protoquilt: something a little bigger than a coaster, much, much smaller than a regular quilt, and even smaller than my original protoquilt. This would be a great first project for trying out the BSR, or something small and fun for the experienced quilter, too! In this tutorial, you’ll also learn how to use a stencil for your free-motion quilting design. It’s a fun technique to try if you don’t yet feel comfortable or artistic enough to do free motion designs.
Materials
Here’s what you’ll need to make one roughly like mine:
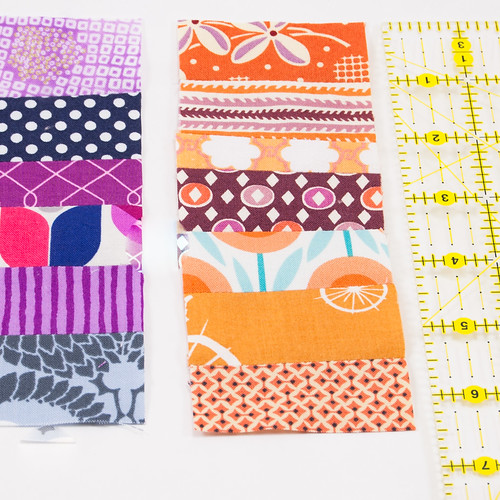
- 10-15 2 1/2″ wide by ~1.5 – 2″H pieces. Scraps work great for this!
- Some solid fabric of your choice for the quilt top. I’m using two strips: one that is about 2″ x 6 1/2″, one that is 1 3/4″ x 6 1/2″ and one piece that’s 6″ x 6.1/2″
- One larger piece for the back of the quilt – about 14″ x 6 1/2″
- One piece of batting – about 14″ x 6 1/2″
- Double-fold binding. You can also use pre-packaged bias tape, if you’d like.
- Thread that roughly matches your solid fabric (or another color of your choice!)
- A stencil (optional)
- Quilt Pounce or a chalk pencil (optional)
Note: If you don’t have a stencil, you can use a chalk pencil and your own design, drawn by freehand, if you wish!
Creating the Patchwork Strips
1) First, cut out a bunch of blocks that are 2 1/2″ x a between 1 and 3 inches tall. The height is up to you.
The end goal is to get two strips of patchwork that are 2 1/2″ W and 6 1/2″ H when finished. Sew your patches together on the 2 1/2″ edges.
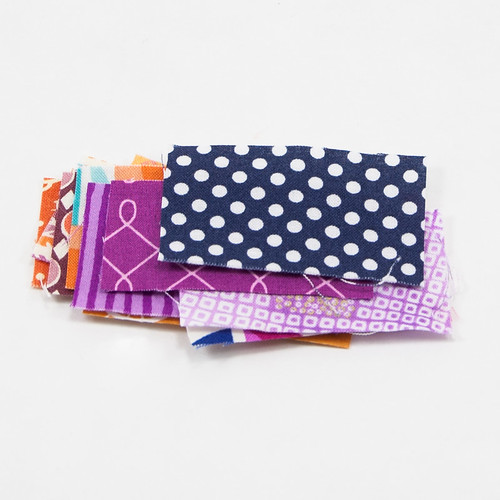
It all starts with a tiny pile of cute fabric.
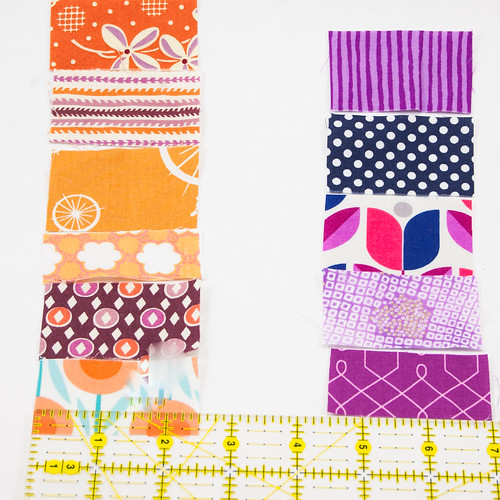
Roughly 2 1/2″ wide and any heights of your choice. Here’s how I’m choosing to arrange mine.
Sew them all up together until you have two strips measuring 2 1/2″W x 6 1/2″ H.
2) Iron open the seams of your patchwork strips
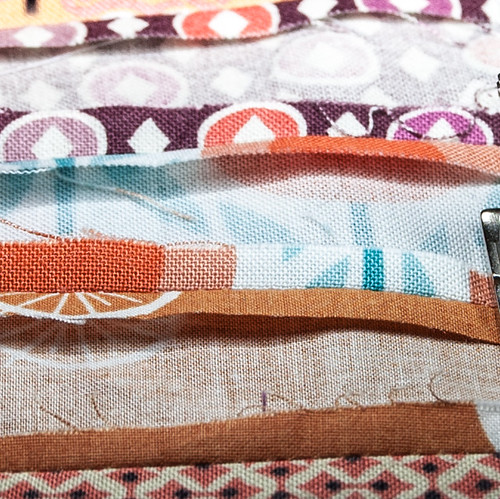
Iron the seams open so that it lies flat, like this.
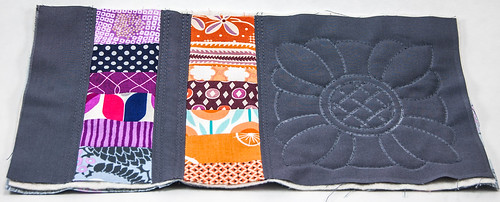
Constructing the Tiny Protoquilt Top
1) Cut your solid fabric. I am using a strip about 2″ x 6 1/2 on the far left, and a slightly narrower strip between my two patchwork strips. The larger square on the right is about 6″W x 6 1/2 H.
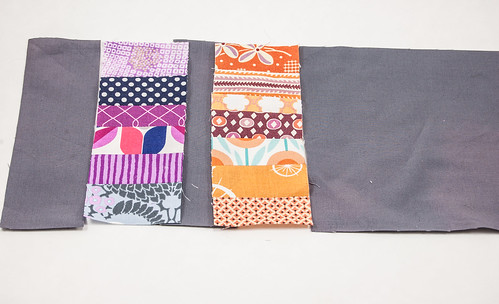
Find the complementing fabric of your choice – a couple of thinner strips, then a larger block that’s about 6″ wide or so.
2) Sew your solid strips together with the patchwork strips. Iron the seams so that they are flat.

Put your Bernina to work and sew them all up together!
Construct Your Quilt Sandwich
1) First, fawn over your beautiful mini-protoquilt top!
2) Square up your quilt top, if you need to. (I always need to!)
3) Cut your backing fabric to be the same size as your quilt top

Looking good! Trim everything up to have straight edges, and pick a background fabric of your choice, the same size as your top. I’m using this delicious Amy Butler number.
4) Place the piece of cotton batting between your quilt top and backing. All of the right sides should be facing out, like in the picture below.

Quilt Sandwich time! Find some batting, and cut a piece that fits snugly between your top and bottom.
Start Quilting!
1) In my mini-protoquilt, I’ve chosen to do some straight lines near the patchwork strips. I think that hightlights them nicely.

I like to do two parallel lines of stitching along each patch. I really should be using a walking foot! Please don’t tell the quilting police!
Stencil It Up
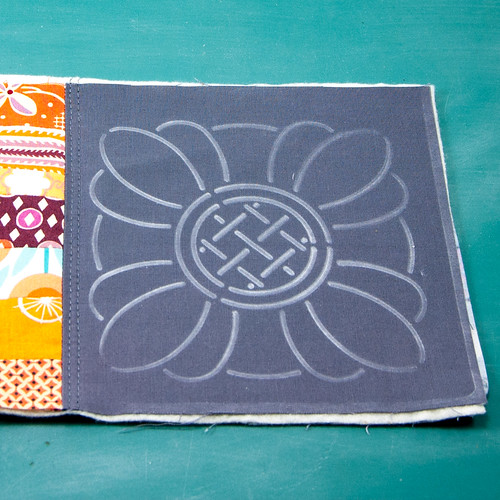
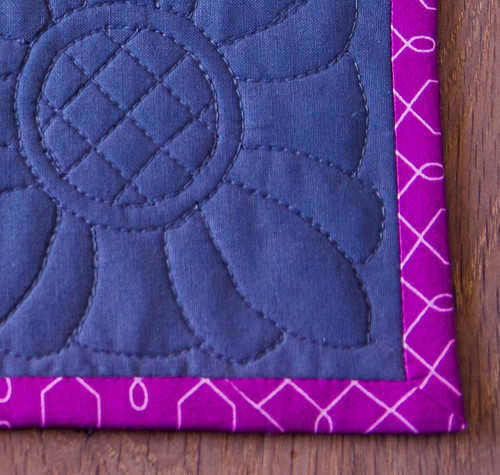
1) If you’re choosing to use a stencil, now’s the time to take it out. I found this lovely flower pattern that was both large and relatively simple-looking.
2) If you’ve decided to try out Quilt Pounce, now’s the time to get this out, too.
Quilt Pounce reminds me of a cross between a blackboard eraser and a sponge. It’s hard on top, with a hole for chalk and a cap to keep it all inside. Put the chalk inside the hole, close the top, and tap on a hard surface until chalk starts coming out evenly from the bottom. This could take a while. The bottom is a furry, spongy surface that allows for the chalk to come out. The chalk disappears with a hot iron. It’s like magic.

So, I found this fancy schmancy stencil that I want to put on my tiny protoquilt. There’s a super-easy way to get stencil lines onto your quilt top that is non-staining, and really easy to remove. No water needed! Quilt Pounce is an eraser-like device that has chalk that you put in the top. You gently tap the eraser against something until the chalk comes out the soft other end. Once this is done, you’re ready to go.
3) Place your stencil where you want it on your tiny protoquilt. I’ve decided to put mine on the large square part.
Quilt Pounce recommends wiping the eraser/sponge across the stencil once or twice. Don’t forget to hold the stencil in place, otherwise it’ll move around.
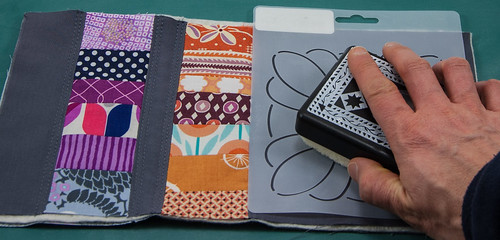
Now the fun part – apply the stencil to the protoquilt! All you have to do is place the stencil where you want it, and wipe the Pounce thingy across the stencil. Make sure to hold on to your stencil, or it will move around! Once this is done, you will have a beautifully-chalked stencil, just waiting for some delightful BSR attention.
4) Remove the stencil and marvel at how easy it was to transfer the stencil design!
Ta da!! Perfect! (OK, so now what?)
BSR Your Way To Success
1) Get your BSR all set up to run. If you forget how, take a peek at this tutorial.
2) Now simply trace the stencil lines with your BSR and watch as the most delightfully even stitches appear before your eyes. With this stencil, I had to go over some lines twice to get to other parts of the stencil without constantly stopping and starting. I suppose how you decide to do this is up to you and dependent on which stencil you go with!
Tip: Steer clear of the edges when quilting! If you find yourself getting towards an edge, you may notice that the sensor stops working and the BSR gets a little finicky. The light of the BSR must stay on fabric to work effectively. If you run into trouble, simply turn the mini-protoquilt 90 degrees or so that the light is shining ON the quilt (not off the edge) and quilt in a different direction.

Enter the fabulous BSR! Trace the stencil with your BSR. The free-motion part comes in so handy here. Just move your protoquilt underneath the BSR, following the stencil lines. Watch the perfect stitches appear before your eyes.
3) Behold your beautiful work. Square up and trim your edges.
All done! Now what about that pesky chalk? You said it was easy to get rid of? YES! All you need to do is iron it. It disappears. Pinky swear, it really works! It does take several passes. But it works.
Attach the Quilt Binding
1) Take the binding that you either bought or made and attach. This tutorial could be of help if you aren’t sure how to do this! There are loads of video tutorials out there, too, if that’s more your style.
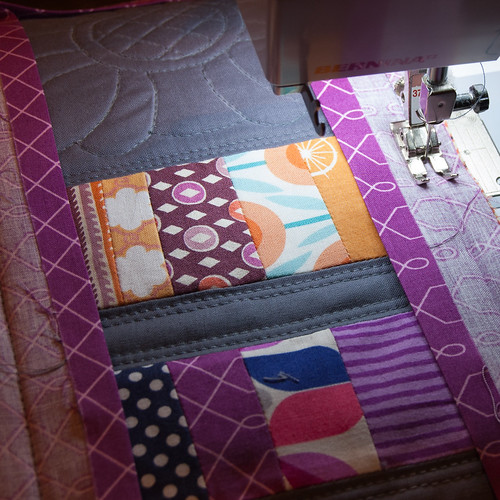
Square up your protoquilt one last time. Find yourself some double-wide quilt binding of your choice, and apply!
2) Iron the finished product to remove the Quilt Pounce and to make sure it’s nice and flat.
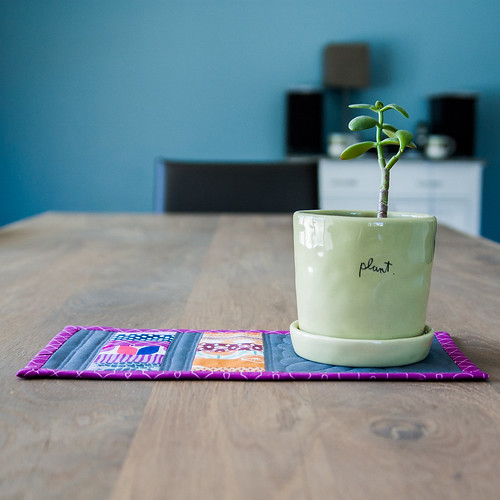
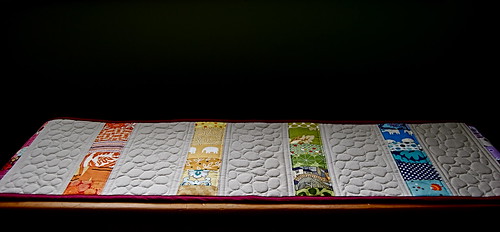
Behold Your Finished Tiny Protoquilt!
1) Check it out – you finished your mini protoquilt! It’s beautiful! Congratulations!
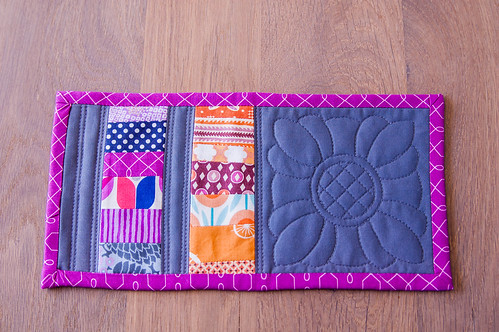
Beautiful! Well done!
Lovely stitching thanks to the BSR.
Ideas of How to Use Your Mini Protoquilt

Place your delicious morning coffee on your mini-quilt!

Perhaps a resting spot for tea service?
My favorite – a plant rest.
Happy quilting!
Posted by robyn on March 18th, 2015 under bernina 440 qe, crafts, sewing, sewing machines, tutorials | 8 Comments »Protoquilting

I recently turned a bunch of random scraps into a protoquilt. The one above is a new bookshelf runner for my craft room.
Protoquilting is a term I’ve been using to describe my random projects that serve to practice quilting techniques that may one day be used for a king-sized mammoth quilt for our bed. Protoquilting is my rationalized pasttime because, really, the thought of creating and quilting a king-sized quilt on my little machine is a little terrifying. So, protoquilts. Cute and easy.

This particular protoquilt was quite inspired by this lovely baby quilt. I found myself enchanted by pebble quilting and thought I should give it a try. I love the way it turned out! And it feels really great in your hands. The beige comes from a skirt that I previously made and cut up. I like it much better now. And the finished product kind of matches my sewing machine cover.
Instead of holding it on my lap, it’ll be serving to keep the grit and water off of my bookshelf from these here plants.

* New year’s resolution: Learn how to take great care of a jade plant! (i.e., see how long I can make it keep living…)
Posted by robyn on February 1st, 2012 under crafts, sewing | 11 Comments »Craft Room Explosion

The other day I felt like making something other than a PodPillow. I noticed my scrap basket was overflowing and I thought I would see about using those. A craft room explosion was the result, although somewhat temporary. Eventually, just about everything was organized into neat little scrap bundles.

The rainbow scraps at the bottom were pulled out for the project, which I’m just finishing up now. More when I’m done!
Posted by robyn on January 21st, 2012 under crafts, random, sewing | 1 Comment »Bernina 440QE: Cleaning and Oiling Your Machine

Each year around the holidays – or more specifically, while I’m in the middle of the holiday sewing craziness – I lament about how infrequently I manage to perform the maintenance that I know my machine so desperately needs at this time of year: cleaning and oiling!
First, the procrastinator makes an appearance: “Just one more bobbin.” or “When I’m done with this quilt!”
Next, denial sets in: “Wow, where are all these fuzzies coming from? Must be this batting.” or “Really, I’m sure that ca-chunk-ca-chunk-ca-chunking is just the dishwasher.”
But the dirty dishes are still piled up, and your projects continue to flow through the machine, one after the other. And you don’t do it. Or at least, I don’t. Not nearly enough.
But there’s no excuse! It’s so easy and takes about 3 minutes. Below are the steps for you to do it yourself. At least someone will be cleaning their machine, even if I’m not.
Cleaning and Oiling Your Machine
Getting started: Unthread your machine and put it in the “needle up” position. Turn it off. Find your brush and oil. The ones pictured above came with my machine.
Step 1 – Approach: Quietly, gently approach the machine in its native habitat. Speak in soothing tones, so it doesn’t suspect anything.

Hunting for fuzzies.
Step 2 – Open the top: Press open the stitch plate beneath the presser foot and remove it.

Woah, this could get ugly. See the fuzzies already trying to escape?

Run! Here they come!
Step 3 – Defuzzify: Brush out all the fuzzies and gunk, bits of broken needles, toast crumbs, dog hair, extra threads, whatever else is stuck in there:

This can get a little messy, and it's hard to get into all of the nooks and crannies.
Step 4 – Appreciate: Admire your clean machine top, and replace the stitch plate:

Clean and fuzzy-free.

Clean top with stitch plate.
Step 5 – Bobbin area: Open up the bobbin door, and remove the bobbin. Clean out the fuzzies you can see.

Clean out what you can see. More detailed cleaning will follow shortly!
Step 6 – Release the bobbin hook: Now, release the housing that holds the bobbin hook in place. There’s a handy little lever on the top left of your machine to release it. Push this lever to the left to release the housing. The housing will flop down:

Press the lever on the top left of your bobbin area to release the metal/black plastic housing. Not so conveniently for this tutorial, my thumb is covering it up.

Step 7 – Remove the Bobbin Hook: Open the bobbin housing and remove the spiky part that sits on the right-half of the bobbin area. This is called the bobbin hook. It’s the part that rotates around the bobbin and makes stitches.

Remove the bobbin hook. Boy, I need hand moisturizer!
This is what it looks like up close:

Bobbin hook up close. I hear this item costs about $70. Treat it nicely!
Step 8 – Clean like the wind!: Now clean out the hook and the rest of the bobbin area with your handy little brush so it looks like this:

Shiny!
Diversion! – Understanding the inside: Small side trip! The bobbin hook sits inside the housing and “races” around in a circle while you’re sewing to make stitches. The little track that it goes around on is called the race. Ultimately, this is the part that needs the oil on it.

The race - this is the part that ultimately needs to have oil on it.

This is the part of the hook that sits in the race.
There are two different ways to get oil onto the race. Are you ready? 3, 2, 1…
Step 9 – Option 1 – Oil the Hook:

The hook, getting a one-drop oil bath.
Step 9 – Option 2 – Oil the Race:

Oiling the race - One drop is all you need!
Place one drop of oil at the bottom of the race hook.
Please note: You only need to do ONE of the above methods. You DO NOT need to do both. When you’re done with your chosen method, the rest of the steps are the same:
Step 10 – Put Humpty Back Together Again: Reinsert the hook into the race and close the housing again:

Clean and put back together.
Step 11 – Run the machine and listen to it purr: As the hook turns in the machine, oil will be distributed along the race. Run the machine without any fabric in it until the oil is distributed. This saves you from the disappointment of getting a bit of oil on your project as the machine settles in to its new-found lubricated state. Machine sounds better, doesn’t it?

Take your new tidy machine for a spin.
When should you oil your machine?
I’ve heard a lot of different things: Every bobbin, every 3-5 bobbins, at each needle change, every day, never… But my rule of thumb is usually the following:
1) After using up 3-5 bobbins.
2) When it start ca-chunking – sometimes the machine just sounds like it needs oil. When this happens, I oil it. It’s possible that it hits this mark after the 3-5 bobbin stage, and comes from my minor neglect, but I will deny this if anyone asks. 😉
3) When Bernina tells you you should – Bernina will display a cute little oil can icon on the front of the machine after about 180,000 stitches, indicating that it’s time to oil. Almost all the sewers I know oil more frequently than this, but it’s a good reminder to get once in a while, and it’s a cute icon, to boot!
![]()
What you shouldn’t do when oiling: Compressed Air
People say that compressed air is ok for the older mechanical machines that are not computerized. However, most sewing pros I know don’t use compressed air on their computerized machines, for fear of blowing the dust into the internals of the machine and messing something up. I’m not sure I buy it completely, but better safe than sorry! I steer clear of it just to be sure!
Hope this little tutorial was helpful. Happy cleaning!
Posted by robyn on December 31st, 2011 under bernina 440 qe, crafts, sewing, sewing machines, tutorials | 90 Comments »Fabric and Photography

Now that I’m back in the sewing groove, I’ve decided to refresh some of the fabrics I’m using. Thankfully, it wasn’t hard to decide where to start (it never is when it comes to finding new fabric, realistically). I’ve been fairly preoccupied with yellow as of late, as evidenced by a new paint job in the bedroom, which is a very strong goldenrod. (Check it out!)
My favorites of the recent batch include some prints from Lotta Jansdotter’s Echo collection, pictured above. I think grey makes such a lovely pairing with yellow and I’m determined to find many uses for this combo wherever I can.
Next, is Joel Dewberry’s new Heirloom collection. I got a half yard of each print in the Ruby collection. I was head over heels for all of the pictures I saw online, but was much less enamored of the actual set when it arrived. Here’s the tempting online picture that drew me in:

(From Fat Quarter Shop – a great online fabric store)
The real thing arrived the other day and was…I don’t know…richer? Less what I expected. Here’s what arrived:

The yellows are quite mustardy, and the whole collection is a bit more vivid than I had anticipated. But I like it! And I will find lots of great spots to use it. I had hoped to use it for a quilt for the bedroom, to match the new curtains in another of Joel Dewberry’s prints, but I just don’t think it’ll go.
Anyway, that’s what’s new here. Oh! And not too long ago, I saw some other bloggers talking about light boxes they made. Light boxes are used to take well-lit still shots with little to no shadows. Having one is really key to great photos, especially when you don’t have the luxury of natural daylight during your photo times. Check out In Color Order Jeni’s here, and the tutorial that helped. I had been using a makeshift light setup for the longest time and it really wasn’t very good. It relied on natural light (not much of that these days, with full time job and dark evenings), and so, inspired by the examples I’d seen, I decided to make my own. Since I didn’t have a cardboard box, I decided to go to the hardware store, use the stock of power tools at my disposal, and make this a more serious and sturdy creation.

It’s larger than I should have probably made it (it’s 2’x2′), but it’s awesome! Light in our house is really sub-par, so having this around is giving me thoughts of covering our entire house in white fabric and pointing flood lights in through the windows. Maybe a project for another day.
Posted by robyn on December 4th, 2011 under crafts, random | 2 Comments »
Back to it.

It appears that a year has come and gone since the last time I posted to this here little blog.
A lot has happened since I last popped in. A busy year to be sure, due to all sorts of things. But in terms of craft chronology, it went something like this:
Nov – May: Sew lots and lots (and lots!) of Podpillows. Become best friends with my local post office clerk. Stockpile fabric. Drive down the price of barley at every supermarket for miles around (seriously – from $1.29 to $.89. That was all me, I swear).
June – Now – Abandon sewing machine. Put Etsy store in “vacation mode.” Spend time recovering from craft overload.
After a few months of recharging, it was this here Joel Dewberry fabric that drew me back into the fold. I spotted it at the second-newest fabric store in town (yes, there are TWO new fabric stores in town. Craft heaven.) and I bought some. I made this wristlet and lots of curtains for home. Here’s the wristlet!

It’s my first foray into flower adornments. I used this awesome tutorial. It’s also my first foray into Melissa Averinos fabric (also found at the aforementioned fabric store. Did I tell you it’s a discount fabric store, too? Love!).
The inside has six slots for credit cards, and, of course, a custom pocket for an iPhone. I carry this sucker everywhere.

Isn’t the power of new fabric amazing? Anyway, glad to be back!
Posted by robyn on November 19th, 2011 under crafts, sewing | 11 Comments »What I Did with my Extra Hour of Daylight: Pink Patchwork Belt

Growing up, I was the type of tomboy kid that refused to wear dresses and play with Barbies, and would instead prefer riding my dirt bike around town. My mom had to try all sorts of tactics to get me to agree to finding and buying a dress for some special occasion (chorus concert! family pictures!), while attempting to stave off the inevitable cranky fighting that would occur during these mutually-dreaded trips. It pains me to think of what a picky, annoying mess of a dress-hating daughter she had to deal with, but she was a pro and had the patience of a saint.
My favorite (and probably the most successful) tactic of hers was when she’d have me wait in the dressing room in some department store, and go out to the sales floor alone and find a few things without me. This way, I couldn’t veto everything at first sight. She’d return and only enter with the dubious goods once I’d closed my eyes. She’d put one of the dresses on me (eyes still closed!) and we’d discuss the merits of the dress (“isn’t it comfortable? feel how soft!”), all with eyes tightly shut. She’d then have me open my eyes, having worked to create a more positive attitude, and have me look in the mirror to see this much talked-up dress. It actually worked and I can remember leaving with a dress on a few occasions.

I’m not sure when or how it happened, but, now, many, many years later, I own lots of dresses, and no one had to coerce me into buying any of them (…my eyes were open the whole time). Perhaps even more surprisingly, the most frequently seen colors in my closet are now pinks and purples. In fact, at times it feels like those are the only colors in my closet. Ryan would agree.
So, when I took a break this weekend from PodPillow production, I decided to make this pink patchwork belt. Happily, it matches just about everything in my wardrobe and I love it!
And now that I’m on such a girl-roll, I’m on the lookout for Barbie fabric. Do they make that? Just kidding.

Thanks everyone for your suggestions on how to get my craft juices flowing. I think I may make a wristlet next. I need something to tote around work that holds an iPhone + a credit card + my (non-existent-but-planned) DD large iced tea cup cozy so that my hands don’t freeze this winter while I feed my daily addiction.
Posted by robyn on November 7th, 2010 under crafts, sewing | 3 Comments »One Woman Sweatshop

The craft scene at the Dog Named Banjo household has been all PodPillows, all the time.
These things are multiplying like Gremlins and heading all over the world to far off lands, battling Customs officials to make their way to desks and eventually cushion adorable little Droids, iPhones and Blackberries everywhere. It’s been a lot of fun, and a lot of work.


Besides the PodPillows, I’m in a bit of a craft slump. Where do you head for inspiration when that happens to you? Can you recommend a fun, easy project to help get me back on the wagon? Note: In true fabric-hoarding fashion, I have ridiculous piles of unused fabric around every corner, spilling off my ironing board, covering my chair that I swore would be for sitting (not piling), just waiting for something good!
Posted by robyn on October 27th, 2010 under crafts | 29 Comments »A new quilt!

I made another quilt! This one is for Melinda & her family, who received it the other day. Now that she has it in her hands, I can show it to you!
It’s a strip quilt made from lots of colorful polka-dot fabrics, and also includes my favorite Elephant fabric plus some Flea Market Fancy that I’m surprised I still haven’t used up after all this time (though, it’s on its last legs to be sure, heading into “scrap” status at this point). Melinda’s family includes two adorable children. I’m hopeful that the kids find this quilt’s colorful disposition not quite as blinding as I do, and instead find it to be fun and joyful instead.
Here’s a view of the front:
Here’s the back (or – the other front)! Mostly brown, some more polka dots for good measure:

I’ve got a few more projects on the docket, but I’m laying off the polka dots for a while for the next up.
Hope you’re all having a great weekend!
Posted by robyn on September 12th, 2010 under crafts, sewing | 7 Comments »Cherry Pitter

Recently I started to crave cherry pie. I’d rarely eaten cherry pie and had never made it, so I’m not sure where this came from. Very likely it was a remnant of my RAGBRAI trip, where pie is a staple food group each day along the way. On the way home from my Iowa adventure, I passed through Ohio, home to Lehman’s – a place with the most awesomeness packed into one store. It’s a store that caters to the Amish community, which doesn’t use electricity. They carry lovely old-fashioned items for the home, including all manners of kitchen items to get jobs done without a power cord. Grain mills, pickling crocks, things for canning, juicing, pressing, grinding, and preserving are all stocked in abundance, many of which are labeled with Lehmans’ signature good, better, best labels of quality.
I drove at least an hour out of my way to drop by and see what wonderful gadgets and other intriguing items I could find, and came home with the Lehman’s Best Cherry Pitter, made by Leifheit.
When I got home, I bought a bunch of cherries and embarked on some serious pitting action. The pitter’s advertising is strong, armed with the label of Lehman’s “best:” pit 26 lbs of cherries per hour! Make prize winning pies! Automatically lifts the cherries and drops them in your bowl!
It all started out great. Cherries piled high into the top, waiting to be pitted. It turns out that the cherry pitting experience with this device was loud, extremely messy, and definitely not foolproof. Each cherry being pitted makes a loud and startling mechanical thump. Before I knew it, it looked like there had been a cherry massacre, with juice splattering absolutely everywhere, and my hands covered in red. There was lots of futzing to get the cherries to fall into the little ditch so the pitter could do its thing, then fishing through all the cherries all over again to find the ones that weren’t actually pitted (turns out this baby has about a 10-15% rate of error…).

It’s much faster than the ones that do one at a time by hand, but the time it takes to go back to make sure you got all the pits makes it not worth it. To add insult to injury, I learned not long after that I’m not really much of a fan of cherry pie! Oh well. It was fun to try.
Posted by robyn on September 8th, 2010 under cooking | 1 Comment »Handmade High Tech

I'm Robyn. Thanks for stopping by! This is my craft blog.
Contact me at robyn [at] dognamedbanjo [dot] com.